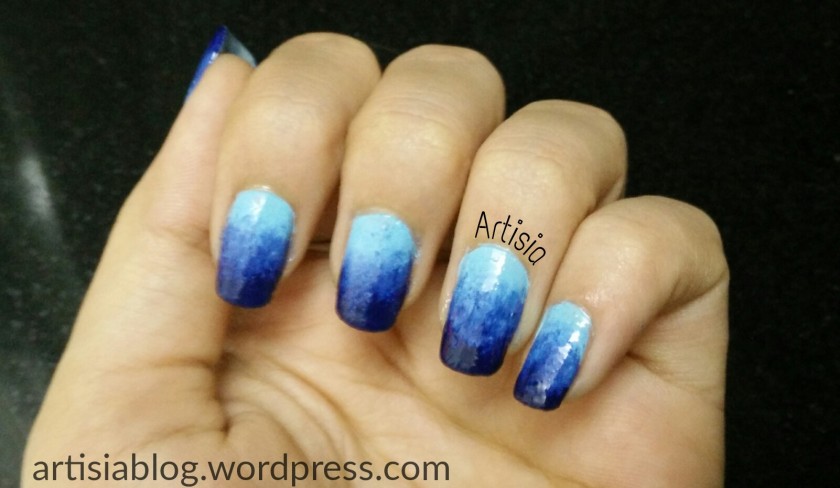
After multiple tries over the span of few months, I have finally mastered the Ombre Nail Art. Continue reading “Bluetiful Ombre Nails”
After multiple tries over the span of few months, I have finally mastered the Ombre Nail Art. Continue reading “Bluetiful Ombre Nails”
It’s Halloween Week! I’m super excited about Halloween 2014. I love everything about the Fright Night, from costumes, make-up, candies, ‘trick or treat’ to creative Halloween nail art!
My nail art for Halloween is Incy Wincy Spider’s Web! I started with the spider web design on four nails.

The spider design is on the thumb. Although the spider is supposed to be scary, considering it’s the fright night, I find this Incy Wincy Spider really cute!!!

What’s your Halloween Nail Art?
“Color! What a deep and mysterious language, the language of dreams.” — Paul Gauguin
Personally, I’m very inspired by colors and love each of them. So, today’s nail art can also be termed as “Inspirational Nail Art” 😉

Color Blocks Nail Art is the perfect nail art for everyday wear. One of the reasons being, it is simple yet effective.
For the design, I have used the following colors:
The process of Color Blocks Nail Art is similar to my previous nail art: Stripes Nail Art with Half Star Motif. Scotch tape is used to keep the white coat intact. The tape is applied such that it creates four blocks for you fill in the colors of your choice. I have made my ring finger as my accent nail by swapping the blocks of Revlon Yellow and L’Oreal Rebel Blue.

Applying the transparent top coat is really essential for these kind of nail. Top coat smoothens the edges of the blocks and gives an appealing luster to the nail art.

Summer or not, be open to welcome the colors of joy in your life 🙂
Stripes Nail Art is one of the basic nail art designs that you must try at least once! In today’s mani, I have clubbed the stripes nail art with a half star motif on the accent nail. Let’s find out how?
First things first, choose a complementary color combination for the nail art. I have used Revlon Lush Green and L’Oreal Rebel Blue.

The green polish is for the base and blue one, being the darker shade, is used for stars and stripes.

How to do it?
Stripes Nail Art is best done using a scotch tape (unless you’re too good at drawing/painting straight lines using a brush). A scotch tape is of great help because it makes the whole process simple and neat while rendering perfect lines and shapes.
Step 1: Apply two coats of green polish.
Step 2: Take a piece of scotch tape and cut out various horizontal lines.
Step 3: Stick the tape lines (leaving gaps in between) on the green base.
Step 4: Apply blue nail polish on the exposed area.
Step 5: Quickly remove the tape with great care.

The half star motif on the accent nail is also done using scotch tape. It’s amazing how this simple tape turns out to be a cool nail art tool, isn’t it?
Here’s the final look…

Stripes nail art works well for nail art pros and beginners alike. Why don’t you give it a try too?
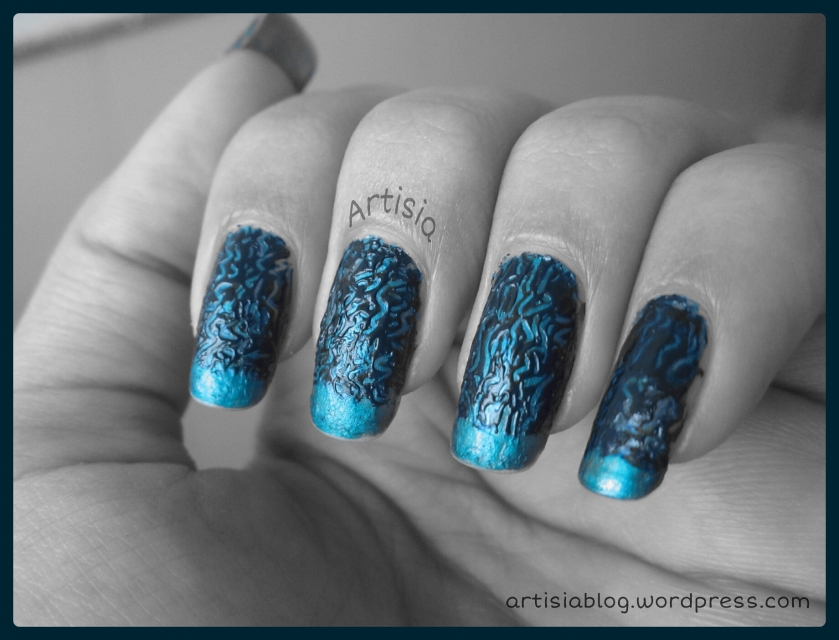
Textured nails are trending! A rough or raised texture on your nails can be a breath of fresh air from the regular shiny polishes and nail arts. The patterns and designs give a new dimension to your nails and make them look nothing less than great artworks!
Here is my recent textured nail art: Turbulent Waters! Continue reading “Textured Nails Tutorial: Turbulent Waters”
